
This was the other RollingStone cover that I saw that had Buffy (Sarah Michelle Gellar) on it. I liked how incredibly difficult it looked and I was eager to get a start on it. Here was the problem. I needed a car in scale to the figure. I bought a model car from a craft store that was a 1:24 scale. I knew it would be a bit small but the box looked larger and the car was PERFECT and it was on sale so I took a risk. When I got it out of the box I was very disappointed. The figure would have been sitting on pretty much the entire front end of the car--in other words, the car was way too small. I knew I needed a 1:12 scale car and I was not going to pay $100 for a model car. As luck would have it (and many months later), I came across an old Ghost Busters car that was in perfect size for a 6 inch figure. Here was my plan. I wanted to just use the front end of the car for the display, for space reasons. So I have this really cool heat gun and I heated the car where I wanted to cut it apart, and I did just that. Here is what I ended up with.

The only modifications I made to this car was the bumper. I had to make the bumper larger so Sarah could have a spot to put her feet. I used some foam board paper and tried to seal the rough spots with some sculpy. It was tricky getting the sculpy to stick to the paper but I think it eventually did.
The next challenge was figuring out what parts to use. I know I was going to use and EOD Buffy figure. I ended up using that, plus both arms from the Vampire Buffy figure, and the bottom of the legs from another figure--maybe a girl wrestling figure. I knew I was going to have to sculpt the feet. There was no way I was going to find feet in this position. As hard as it is sculpting feet I guess I don't mind the challenge. Here is a close up of Sarah's feet, and the parts I used:


I first had to hot glue the parts together just to make sure I had them in a good position to rest on the bumper (and look like her knees are in the air). Then I had to cut away at the shirt and the front part of her hair. I sculpted the top of her chest and neck area, and head. If you can see it I did sculpt in her collar bone.


I then sculpted the shirt. I had a few ideas in mind for the glittery shirt. My first idea was to sculpt her shirt so it was bumpy. I have silver, metallic paint and I thought that might give it the sequins look. I tested a spot but it didn't look right (plus as I was handling it my fingers would press down any bumps I made). So I opted to use glitter and worry about putting it on later. I did test an area just to see if the glitter would be in correct size and it was. Her shirt does have ridges on the side where it's bunched up (which I like how that looked) and I was afraid I was going to lose that adding the glitter but I think it worked out well. Here are some of those pictures:


Then it was time to sculpt the legs. I ended up cutting down the foot area a lot more than what the picture shows. I started up at the thigh and sculpted my way downward. The first foot was pretty easy to do. I just had to keep looking at the picture to see how the foot was angled and also make sure it would rest on the car's bumper. Here are some of those pictures. I was quite impressed with this foot.


(This one is my favorite foot picture)

Here was my next worry. Since the first foot looked amazing I was really worried I was not going to get the second one to look as good. It's like when I paint, I can get one eye to look exactly like the person, but the second eye is the downfall. I don't think the second foot turned out all that bad. The toes didn't show up as distinguished as the first, but for having done this from scratch it turned out really well!


The foot (toes) look good in this picture but when I went to paint them it lost the distinguishing features.

Once I had the feet sculpted I did the pants and then I started the arms. I cut away at the elbow and then I sculpted each arm, first off the figure, then I glued the arm onto the figure and sculpted the shoulders. I even figured that the way Sarah's arms are her shoulder blades must be sticking out some so on the back of the figure you can see I sculpted it that way.
Finally I sculpted the hair. I have learned to start at the bottom of the head and work my way up. The bottom wind swept hair wasn't too hard to do. I figured her hair in the back must be off her back so I managed to get that to look real. The hardest part was the top of the hair. It almost has a triangular shape to it the way it has to blow off her head. I think the hair could have been longer but I was also going for durability since this clay can break easily. I am overall very satisfied with how her hair turned out. Here are many pictures of that:


Here is the car, painted. I added some glitter into the green paint to give it that new car glitter shine. I also mounted the car to a piece of foam board and painted it. It was not cut evenly at all so that is why some of the back looks crooked. I had used hot glue to fuse the two pieces (car to board). If you also notice I had to put a stick on the bottom of the car so it wouldn't tip down. I used some metallic spray paint for the bumper. The car's color probably should have been a bit darker. I also put a coat of scenic water on the car to make it shine. When I did this it really made the glitter in the paint sparkle. If you also notice the hood of the car has a dent...that was my fault. I heated the car and tried to press Sarah into it so she would sit better. I made a slight mistake and then tried to fix it with sculpy which wouldn't stick and then I used caulk. I guess it is fine. You can't see it when Sarah is on top.


Sarah starting to get painted:


Sarah starting to get painted:

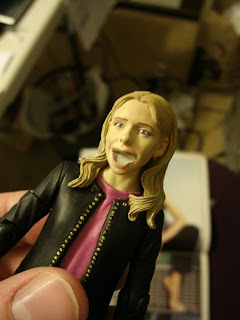
And the finished pieces: I am a bit bummed the face didn't turn out to be what I had imagined. Her eyes look sad along with her lips. I tried to paint her lips to have an up turn but it looked clownish. The paint was starting to get thick on the face so I didn't want to keep trying to fix the eyes. What you see isn't bad but it's not exactly like the picture, either. She looks sad, but overall I'm still quite pleased. I painted some watered down tacky glue on the shirt then sprinkled glitter. I then pressed it in place. For the shirt's straps I painfully glued each piece of glitter.
Keep in mind if you click on the pictures you're going to get a magnified verson of reality so any mistakes that you normally can't see will be seen in the pictures. I also realize that the pants have blue-ish swirls to them....that was due to the flash in the camera. Sarah's pants are dark, dark blue and so are the figure's pants, the flash ruined it.


(The next three are my favorite pics.)


Inside the magazine there is another picture of Sarah on the car but this one she is touching her face and her mouth is open. I have many Buffy Bot heads and I contemplated doing this pose. I wanted to again stretch my talent and make the mouth. In the end it would have been a much better head to use (easier to paint) but I decided against using that head due to time. I probably won't make this figure again unless I was commissioned to make the figure using this head. Anyway, here are some of those pictures...


Feel free to comment if you like what you see. You can also check out my posting on the Buffy Figs Forum found here: http://btvsfigs.proboards.com/index.cgi?board=Customize&action=display&thread=16919
No comments:
Post a Comment